In this tutorial, I will demonstrate how to host an ASP.NET Core 2.2 application on Windows Containers by using a Docker image. A Docker image will be packaged with an ASP.NET Core application that will be run when a container is spun up.
Before we get started with creating a Docker image. Let’s make sure we have prerequisites done.
Prerequisites
- Installing docker-cli and other components to get started
- Visual Studio code.
- Docker extension for visual studio code.
Once you have the prerequisites, we will use a publicly available ASP.NET Core base image from Microsoft. Microsoft maintains their Docker images on Docker hub. Docker hub is a container registry to manage your Docker images either by exposing the image publicly or maintaining it privately. Private image responsibilities cost money. Visit Docker Hub website to learn more about image repository management.
Building your first Docker Image
Step 1: Open the PowerShell console as an administrator
Step 2: Let’s get started by pulling ASP.NET Core 2.2 Docker image from Docker hub by executing the below command.
docker pull mcr.microsoft.com/dotnet/core/aspnet:2.2Your output should look similar to what is shown below:

Step 3: Create a folder with your preference name whatever you prefer. I will use c:\docker\ for demonstration purposes.
mkdir c:\dockerStep 4: Download ASP.NET Core application package from this URL.
Invoke-WebRequest -UseBasicParsing -OutFile c:\docker\WebAppCore2.2.zip https://github.com/rahilmaknojia/WebAppCore2.2/archive/master.zipWhat we are doing in the above command is downloading packaged code that is already built to save time on building a package.
Step 5: Extract WebAppCore2.2.zip by using the PowerShell 5.0 native command. If you do not have PowerShell 5.0 and above, you will have to manually extract the package.
Expand-Archive c:\docker\WebAppCore2.2.zip -DestinationPath c:\docker\ -Force Step 6: Now let’s create a Docker file in c:\docker folder.
New-Item -Path C:\docker\Dockerfile -ItemType FileStep 7: Go ahead and open C:\docker folder path in Visual Studio Code.
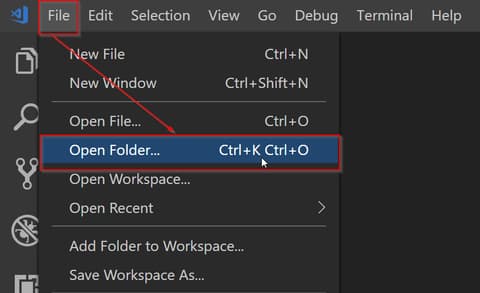
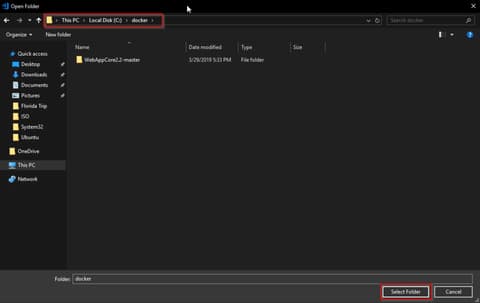
Step 8: Now we will open Dockerfile by double-clicking on the file in Visual Studio Code to start writing the required steps to build an image.
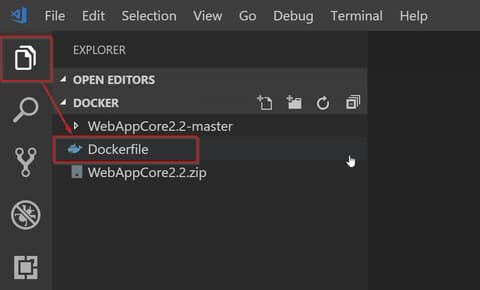
Copy and paste the code below into Dockerfile.
# Pull base image from Docker hub
FROM mcr.microsoft.com/dotnet/core/aspnet:2.2

# Create working directory
RUN mkdir C:\\app

# Set a working directory
WORKDIR c:\\app

# Copy package from your machine to the image. Also known as staging a package
COPY WebAppCore2.2-master/Package/* c:/app/

# Run the application
ENTRYPOINT ["dotnet", "WebAppCore2.2.dll"]
What we told the
Now that you have the required steps to build an image, let’s go ahead with the below steps.Dockerfileis to pull an asp.net core base image from Docker hub. Then we ran a command to create a directory calledappinc:\apppath. We also told the container to setc:\appas a working directory. That way we can access binary directly when the container is spun up. We also added a step to copy all the binaries fromc:\docker\WebAppCore2.2-master\Package\to destination path in containerc:\app. Once we had the package staged in the container, we told it to run the application by executingdotnet WebAppCore2.2.dllso that the app would be accessible from outside the container. To learn more aboutDockerfilefor Windows, check out this Microsoft documentation.
Step 9: Navigate to Dockerfile working directory from PowerShell console. If you are already in that path, you can ignore it.
cd c:\dockerStep 10: Execute the below command to build a container image.
docker build -t demo/webappcore:2.2.0The above command will create a Docker image under demo path. With the image name called as webappcore and version 2.2.0.
Your output should look like below once it is successful:
PS C:\docker> docker build -t demo/webappcore:2.2.0 .
Sending build context to Docker daemon  9.853MB
Step 1/5 : FROM mcr.microsoft.com/dotnet/core/aspnet:2.2
 ---> 36e5a01ef28f
Step 2/5 : RUN mkdir C:\\app
 ---> Using cache
 ---> 8f88e30dcdd0
Step 3/5 : WORKDIR c:\\app
 ---> Using cache
 ---> 829e48e68bda
Step 4/5 : COPY WebAppCore2.2-master/Package/* c:/app/
 ---> Using cache
 ---> 6bfd9ae4b731
Step 5/5 : ENTRYPOINT ["dotnet", "WebAppCore2.2.dll"]
 ---> Running in 4b5488d5ea5f
Removing intermediate container 4b5488d5ea5f
 ---> 9729270fe1ac
Successfully built 9729270fe1ac
Successfully tagged demo/webappcore:2.2.0
Step 11: Once the image has been built, you are now ready to run the container. Execute the below command.
docker run --name webappcore --rm -it -p 8000:80 demo/webappcore:2.2.0The above command will create a new container called webappcore with parameters.
--rmis used to automatically remove the container after it is shutdown.-itwill open a session into your container and output all the logs.-pis used for creating an external port and assigning it to the internal port of a container. Port 8000 is exposed to outside containers, and port 80 is used to access the app within the container.demo/webappcore:2.2.0is the path to the Docker image to run as a container.
Output of a running container

Step 12: Browsing your application from your local machine localhost:8000.
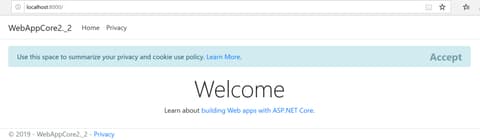
This is it! You ran your first Docker container in your local environment. Thank you for following the tutorial. Please comment below for any issue or feedback you would like to share.