Kubernetes 1.14 now provides out of the box support for Windows worker nodes to run windows containers with in a Kubernetes cluster. This feature was in preview for a long time, and now it is production ready. This is a wonderful opportunity for most cloud giant companies to start applying a new version of Kubernetes 1.14 to their offering. So that they can get their customers to start migrating their applications that run on Windows virtualization platform to windows containers quicker.
NOTE: Azure, Google, IBM, AWS now offer Kubernetes services that offer free cluster management, so you do not have to worry any longer. Windows containers are yet to be offered and should be available soon. Check out their official websites to find out more information on when they will be able to offer windows containers.
In this tutorial, I will go over how to Setup windows node and join that to existing Kubernetes cluster with 1.14 version. If you do not have a Kubernetes cluster and would like to learn how to set it up. Check out the below prerequisites.
Prerequisites
- How to setup Kubernetes 1.14 cluster on CentOS 7.6.
- Windows Server 2019 version 1809 and should have all the updates installed.
NOTE: Before we move forward, ensure you have successfully setup
a Kubernetes 1.14cluster on your Linux machine. If not, check out the prerequisites.
Enable mixed OS scheduling
The below guide was referenced from Microsoft documentation.
Login to your master node and execute the below commands.
cd ~ && mkdir -p kube/yaml && cd kube/yamlConfirm kube-proxy DaemonSet is set to Rolling Update:
kubectl get ds/kube-proxy -o go-template='{{.spec.updateStrategy.type}}{{"\n"}}' --namespace=kube-systemDownload node-selector-patch from GitHub:
wget https://raw.githubusercontent.com/Microsoft/SDN/master/Kubernetes/flannel/l2bridge/manifests/node-selector-patch.ymlPatch your kube-proxy
kubectl patch ds/kube-proxy --patch "$(cat node-selector-patch.yml)" -n=kube-systemCheck the status of kube-proxy
kubectl get ds -n kube-system[rahil@k8s-master-node yaml]$ kubectl get ds -n kube-system
NAME DESIRED CURRENT READY UP-TO-DATE AVAILABLE NODE SELECTOR AGE
kube-flannel-ds-amd64 2 2 2 0 2 beta.kubernetes.io/arch=amd64,beta.kubernetes.io/os=linux 106m
kube-flannel-ds-arm 0 0 0 0 0 beta.kubernetes.io/arch=arm 106m
kube-flannel-ds-arm64 0 0 0 0 0 beta.kubernetes.io/arch=arm64 106m
kube-flannel-ds-ppc64le 0 0 0 0 0 beta.kubernetes.io/arch=ppc64le 106m
kube-flannel-ds-s390x 0 0 0 0 0 beta.kubernetes.io/arch=s390x 106m
kube-proxy 2 2 2 2 2 beta.kubernetes.io/os=linux 21hYour kube-proxy node selector status should show beta.kubernetes.io/os=linux get applied.
Setting up flannel networking
Below guide was referenced from Microsoft documentation.
Since I already have kube-flannel setup from previous tutorial, I will go ahead and edit it by following the below guide and update the values accordingly.
On your master node, edit kube-flannel and apply changes that are needed to configure windows worker node.
kubectl edit cm -n kube-system kube-flannel-cfgIf you already know how to use the vi editor, you should be able to navigate with in the edit mode. Go ahead and find the below block of code and update it with the as shown below:
cni-conf.json: |
    {
      "name": "vxlan0",
      "plugins": [
        {
          "type": "flannel",
          "delegate": {
            "hairpinMode": true,
            "isDefaultGateway": true
          }
        },
        {
          "type": "portmap",
          "capabilities": {
            "portMappings": true
          }
        }
      ]
    }
And, your net-conf.json should look like this shown below:
net-conf.json: |
    {
      "Network": "10.244.0.0/16",
      "Backend": {
        "Type": "vxlan",
        "VNI" : 4096,
        "Port": 4789
      }
    }
Once you have updated your kube-flannel configmap, go ahead and save it to apply those changes.
Target your kube-flannel to only Linux by executing the below command:
kubectl patch ds/kube-flannel-ds-amd64 --patch "$(cat node-selector-patch.yml)" -n=kube-systemInstall Docker on your Windows node
Install-Module -Name DockerMsftProvider -Repository PSGallery -Force
Install-Package -Name Docker -ProviderName DockerMsftProvider
Restart-Computer -Force
Download and stage Kubernetes packages
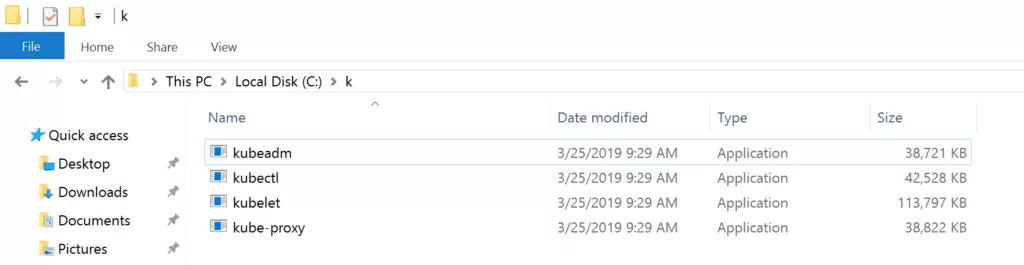
Step 1: Open PowerShell as an administrator and execute the below command to create a directory called k.
mkdir c:\k; cd c:\kStep 2: Download Kubernetes 1.14.0 from github and download kubernetes-node-windows-amd64.tar.gz.
Step 3: Extract the package to c:\k path on your Windows node.
NOTE: You may have to use a third party tool to extract tar and gz files. I recommend using portable 7zip from here. So that you don’t have to install it.
Find kubeadm,kubectl, kubelet, and kube-proxy and copy it on windows node under c:\k\. Should look like below.
Copy Kubernetes certificate file from master node
Go to your master node under ~/.kube/config of your user home directory and paste it to c:\k\config.
You can use xcopy or winscp to download config file from master node to windows node.
Add paths to environment variables
Open PowerShell as an administrator and execute the following commands:
$env:Path += ";C:\k"; $env:KUBECONFIG="C:\k\config"; [Environment]::SetEnvironmentVariable("Path", $env:Path + ";C:\k", [EnvironmentVariableTarget]::Machine); [Environment]::SetEnvironmentVariable("KUBECONFIG", "C:\k\config", [EnvironmentVariableTarget]::User)Reboot your system before moving forward.
Joining Windows Server node to Master node
To join the Flannel network, execute the below command to download the script.
Step 1: Open PowerShell as Administrator:
[Net.ServicePointManager]::SecurityProtocol = [Net.SecurityProtocolType]::Tls12
 wget https://raw.githubusercontent.com/Microsoft/SDN/master/Kubernetes/flannel/start.ps1 -o c:\k\start.ps1
Step 2: Navigate to c:\k\
cd c:\k\Step 3: Execute the below command to join Flannel cluster
.\start.ps1 -ManagementIP 192.168.0.123 -NetworkMode overlay -InterfaceName Ethernet -VerboseReplace ManagementIP with your Windows node IP address. You can execute ipconfig to get these details. To understand the above command, please refer to this guide from Microsoft.
PS C:\k> .\kubectl.exe get nodes
NAME                STATUS     ROLES    AGE   VERSION
k8s-master-node     Ready      master   35h   v1.14.0
k8s-worker-node-1   Ready      <none>   35h   v1.14.0
win-uq3cdgb5r7g     Ready      <none>   11m   v1.14.0
Testing windows containers
If everything went well, and you see your Windows node joined the cluster successfully. You can deploy a Windows container to test if everything is working as expected. Execute the below commands to deploy a Windows container.
Download YAML file:
wget https://raw.githubusercontent.com/Microsoft/SDN/master/Kubernetes/flannel/l2bridge/manifests/simpleweb.yml -O win-webserver.yamlCreate new deployment:
kubectl apply -f .\win-webserver.yamlCheck the status of container:
kubectl get pods -o wide -wOutput
PS C:\k> .\kubectl.exe get pods -o wide -w
NAME                            READY   STATUS              RESTARTS   AGE   IP       NODE              NOMINATED NODE   READINESS GATES
win-webserver-cfcdfb59b-fkqxg   0/1     ContainerCreating   0          40s   <none>   win-uq3cdgb5r7g   <none>           <none>
win-webserver-cfcdfb59b-jbm7s   0/1     ContainerCreating   0          40s   <none>   win-uq3cdgb5r7g   <none>           <none>
Troubleshooting
If you are receiving something like below. That means your kubeletwin/pause wasn’t built correctly. After spending several hours. I dig through all the script that start.ps1 script does, and I found out that whenever Docker image was built, it didn’t use the correct version of container image.
Issue
Error response from daemon: CreateComputeSystem 229d5b8cf2ca94c698153f3ffed826f4ff69bff98d12137529333a1f947423e2: The container operating system does not match the host operating system.
(extra info: {"SystemType":"Container","Name":"229d5b8cf2ca94c698153f3ffed826f4ff69bff98d12137529333a1f947423e2","Owner":"docker","VolumePath":"\\\\?\\Volume{d03ade10-14ef-4486-aa63-406f2a7e5048}","IgnoreFlushesDuringBoot":true,"LayerFolderPath":"C:\\ProgramData\\docker\\windowsfilter\\229d5b8cf2ca94c698153f3ffed826f4ff69bff98d12137529333a1f947423e2","Layers":[{"ID":"7cf9a822-5cb5-5380-98c3-99885c3639f8","Path":"C:\\ProgramData\\docker\\windowsfilter\\83e740543f7683c25c7880388dbe2885f32250e927ab0f2119efae9f68da5178"},{"ID":"600d6d6b-8810-5bf3-ad01-06d0ba1f97a4","Path":"C:\\ProgramData\\docker\\windowsfilter\\529e04c75d56f948819cd62e4886d865d8faac7470be295e7116ddf47ca15251"},{"ID":"f185c0c0-eccf-5ff9-b9fb-2939562b75c3","Path":"C:\\ProgramData\\docker\\windowsfilter\\7640b81c6fff930a838e97c6c793b4fa9360b6505718aa84573999aa41223e80"}],"HostName":"229d5b8cf2ca","HvPartition":false,"EndpointList":["CE799786-A781-41ED-8B1F-C91DFEDB75A9"],"AllowUnqualifiedDNSQuery":true}).
Solution
- Go to
c:\k\and open Dockerfile. - Update first line to
FROM mcr.microsoft.com/windows/nanoserver:1809and save the file. - Execute the below command to build an image as administrator from a PowerShell console.
cd c:\k\; docker build -t kubeletwin/pause .- Open
win-webserver.yamland update image tag toimage: mcr.microsoft.com/windows/servercore:1809. - Delete and Re-apply your deployment by executing the below command.
kubectl delete win-webserver
kubectl apply -f .\win-webserver.yaml
Now all your pods should show in running state.
PS C:\k> kubectl get pods
NAME                            READY   STATUS    RESTARTS   AGE
win-webserver-cfcdfb59b-gk6g9   1/1     Running   0          6m44s
win-webserver-cfcdfb59b-q4zxz   1/1     Running   0          6m44s